 This article will discuss about the more common 10 places on our blog where we can place ads and about how to implement them and also which are the most suitable formats based on those available in our AdSense account.
Advertisements
- In the Sidebar
How to implement.This is one of the easiest places to place AdSense. Just go to the page elements (layout), click on the "Add a Gadget" link and add an HTML/Javascript widget with your ad code inside it or add directly an AdSense widget.
Recommended formats: 125 × 125, 120 × 600 and 160 × 600
- Between posts
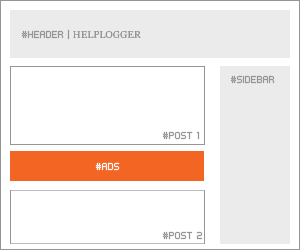
Implementation. You can implement AdSense ads between your posts: go to Layout, click on the "Edit" link below the Blog Posts section, then check the "Show Ads Between Posts" option.Recommended formats: 468 × 60, 300 × 250 and 336 × 280
- Under the header
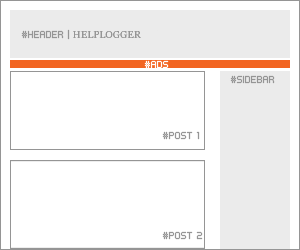
Implementation:
Firstly, convert your AdSense ad code. You can use this converter here:
AdSense Ad Converter
Then, go to your Blogger Template (from your Dashboard, click on Template and press the Edit HTML button) and search for:
<div id='header-wrapper'>Then paste the converted code right after it.
Recommended formats: 728 × 90 and 728 × 15
- Above the blog posts
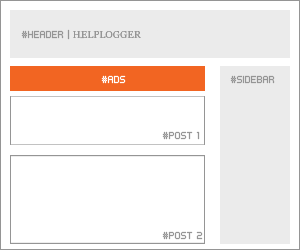
Implementation:
Convert your ad code and search for <div id='main-wrapper'> in your template.
Paste the converted code right after it.
Recommended formats: 460 × 68, 468 × 15 and 336 × 280
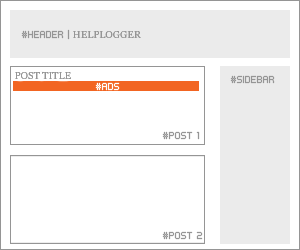
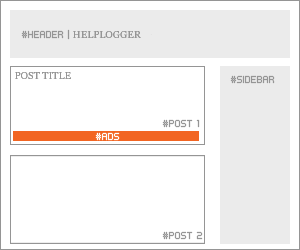
Under the title of the post (this will be visible on all the pages)
Implementation:
Convert your AdSense ad code and then go to your Template, Expand Widget Templates and look for:
<div class='post-header-line-1'/>Note: if you can't find it, search it without the ending slash /
Paste the converted code right after it.
Recommended formats: 468 × 68 and 468 × 15
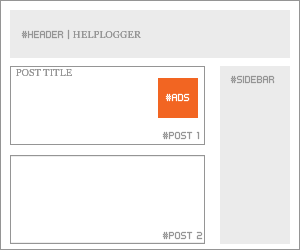
- Under the post title (visible only on the posts pages)
Implementation:Convert your ad code and then go to your Template, Expand Widget Templates and look for:
<div class='post-header-line-1'/>Note: if you can't find it, search it without the trailing slash /
Paste the converted code, following this example:
<b:if cond='data:blog.pageType == "item"'>Recommended formats: 468x68 and 468x15
<!-- Here your ad code -->
</b:if>
- In the posts' footer
Convert your ad code and then go to your Template, Expand Widget Templates and look for:
<p class='post-footer-line post-footer-line-3'/>Note: if you can't find it, search it without the trailing slash /
Paste the converted code right after this line.
Recommended formats: 468x68 and 468x15
- In the post's body (it will be visible on all pages)
Implementation:Convert your ad code and then go to your Template, Expand Widget Templates and look for:
<div class='post-body entry-content'>Note: in case you don't fint this code, search only for <div class='post-body'>
And paste the converted code, following this example:
<div style='float:right'>Recommended formats: 125x125, 180x150, 120x240 and 200x200
<!-- Here ad code -->
</div>
- In the post's body (visible only in post pages)
Convert your ad code and then go to your Template, Expand Widget Templates and look for:<div class='post-body entry-content'>Note: in case you don't fint this code, search only for <div class='post-body'>
And paste the converted code, following this example:
<b:if cond='data:blog.pageType == "item"'>Recommended formats: 125x125, 180x150, 120x240 and 200x200
<div style='float:right'>
<!-- Here your ad code -->
</div>
</b:if>
- Between post and comments (visible only on posts pages)
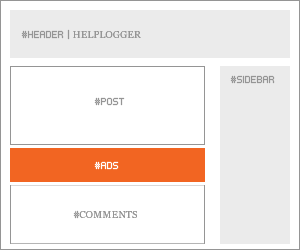
Implementation:Convert your ad code and then go to your Template, Expand Widget Templates and look for:
</b:includable>Paste the converted code just above it, following this example:
<b:includable id='commentDeleteIcon' var='comment'>
<b:if cond='data:blog.pageType == "item"'>Recommended formats: 468x60, 300x250 and 336x280
<!-- Here comes your ad code -->
</b:if>
- In the blog's footer
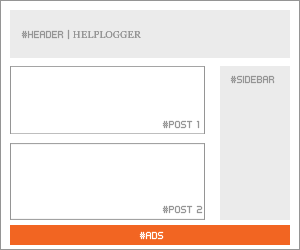
Implementation:Convert your ad code and then go to your Template, Expand Widget Templates and look for:
<div id='footer-wrapper'>Paste the converted code right after it.
Recommended formats: 728x90 and 728x15
Note: If this tutorial worked for you (and it should work), please leave a comment below. Thanks.
Written by Unknown
We are Creative Blogger Theme Wavers which provides user friendly, effective and easy to use themes. Each support has free and providing HD support screen casting.


0 comments:
Post a Comment