Thursday, July 11, 2013

Experience Android 4.1 Jelly Bean on Your Windows, Mac and Linux Computer

Android-4.1-Jelly-Bean-on-Windows
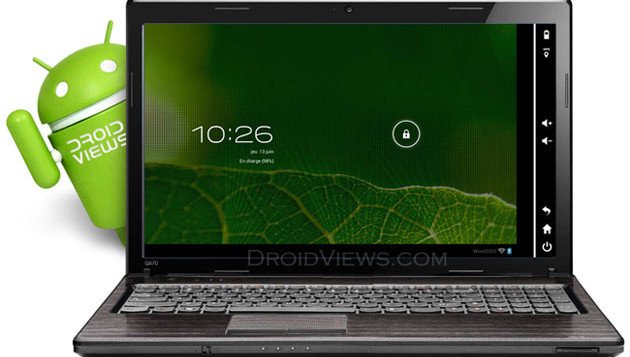
Have you ever fancied experiencing you favourite operating system for mobile on your desktop or laptop computer? The very idea of any possibility of such thing might thrill any tech-enthusiast. In the past, we shared another emulator tool for Windows based computers that could recreate Android  environment. That tool called “WindowsAndroid” emulated Android 4.0 Ice Cream Sandwich on a pop window. You can know about that program here.
Here is another amazing emulator that does the same stuff but in a little more charming way. Genymotion, as this emulator is called,  is a complete set of tools that provides a virtual environment for Android. The program is easy to use when set-up but before that it is a little complicated.
The Genymotion Android emulator can be very useful for developers and app testers because it also supportsADB (Android Debug Bridge) and thus you can various tasks with it and even play games that are not compatible with your Android device.
If you are a developer, you’ll have have to install the Eclipse plugin before you can test your application developed with Eclipse IDE. It uses ADB to connect to any active Genymotion Virtual Devices and then push your applicationvia commands. While installing Genymotion, you are asked to choose an Android device that you want to emulate and the list of virtual devices with various screen resolutions is pretty big.

COMPATIBILITY:

To be able to install this Android emulator on your computer, you must have a system with any of the following Operating Systems:
  • Microsoft Windows XP SP3 (32 or 64 bits)
  • Microsoft Windows Vista (32 or 64 bits)
  • Microsoft Windows 7 (32 or 64 bits)
  • Linux Ubuntu 12.04
  • Linux Ubuntu 12.10
  • Mac OS X 10.X

DOWNLOADS:

To download the program, hit the link below and sing up with Genymotion.
Genymotion with VirtualBox

HOW TO INSTALL:

As I mentioned above, setting up Genymotion is a bit complex and for that you’ll need a guide on how to get things started.
  1. Download the Genymotion installer from the link above and run it on your Windows/Mac/Linux computer.
  2. When the installation is finished, double click the “GenyMotion” icon shortcut created on your desktop. Mac users can click on the icon from App directory and those with Linux can launch it by typing: [InstallationPath]/genymotion]
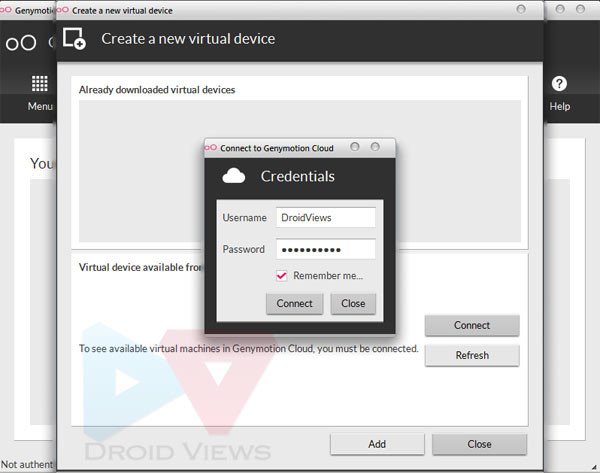
  3. When it is launched, click on Add button and then enter your Genymotion User name and Password when prompted.GenyMotion-Set-up
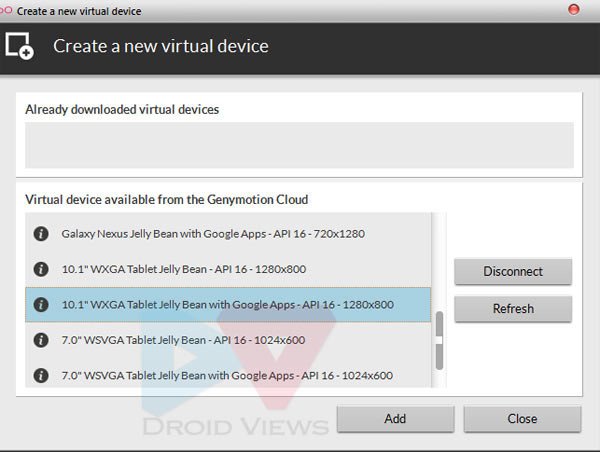
  4. Next, you’ll be asked to choose a virtual Android device which you want to emulate on your computer. Select a device from the list  and then click on Add button.GenyMotion-Set-up-2
  5. On the next screen, you’ll be shown the virtual device properties. Click on Next button.
  6. Your selected virtual Android device’s file will be downloaded now. In my case, it was 200 MB in size. When the download is finished, click on Next button.
  7. Then choose a name for your new virtual device, and then click on Finish.
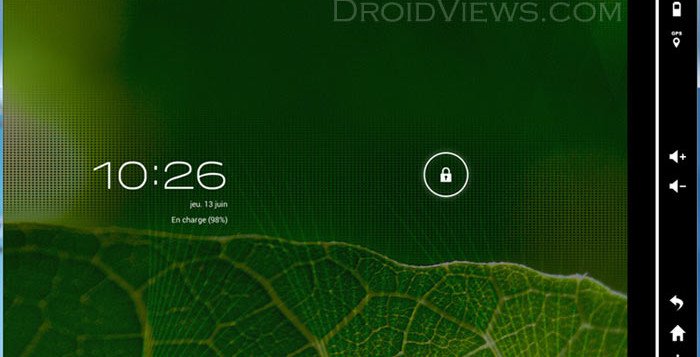
  8. Your virtual device will be created and you’ll see the following screen.GenyMotion-Set-up-3
  9. Now close this window to come back to the main window.
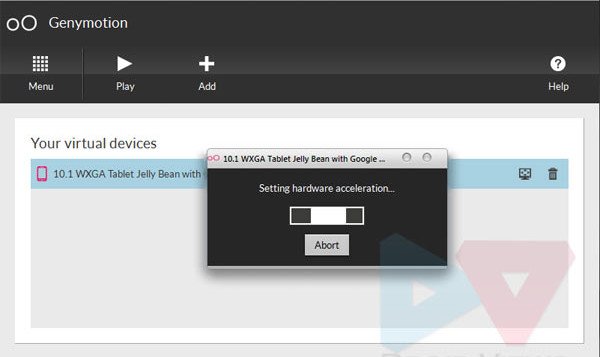
  10. Finally, you’ll be greeted with the main window. Just click on the Play icon and wait till the real action begins.GenyMotion-Set-up-4
  11. The emulator will ask you to define your Android SDK location before launching, If you have installed it, select the location. In case, you do not have it or do not want it for development purposes, just skip it.
  12. Your selected virtual Android device will now be ready at your service. If you are an Android user, I do not think you need any further guidance on how to explore the interface and settings.
Genymotion-android-emulator
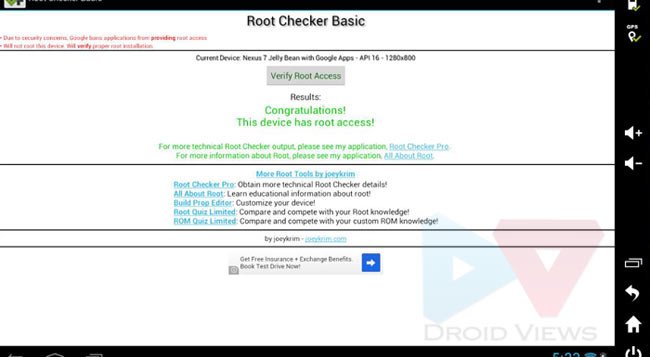
I forgot to mention it above that the Android 4.1 environment that you have on you computer is very much like your rooted phone. Just play with it, install your favorite apps and do all stuff that you do on your real phone except making calls.
Genymotion-app-root-access
Do not forget to share with us how Android feels on your computer! Cheers to all!

How to Boot Android Devices into Safe Mode

Safe-Mode-Android
Android is the most popular operating system for mobile devices and we love it for being open source, easy to customize, having nice features and millions of apps. While most of the apps are awesome, there are still many that might have had a bed impact on the performance and battery-life of your device. There are yet a few freaking apps out there that are capable of screwing up your Android phone or tablet in such a way that a basic users might find not find a way out.
It has just been a couple of days when I experienced a very irritating situation on my HTC One. Actually, I was looking for an app that could let me unlock the One by pressing any of  the volume keys on the phone. After a little digging, I went for an app called Button Lock Screen (never try this crap, guys!), and enabled it. It did not work at all and my phone was stuck on the lock screen. Since HTC one does not have an external SD card slot, all my data was on the device itself and so I wanted to avoid a data/factory reset.
It was then that the “Safe Mode” thing hit my mind. And let me tell you guys, it was just a lifesaver for me! Thanks to Google for adding this mode to Android. So, what is the Safe Mode and what is its role on your Android devices?

WHAT IS SAFE MODE?

If you use Windows, you must be familiar with Safe Mode. The option to boot your PC into this mode comes up when your computer shuts down unexpectedly due to power cut or any other reason. Android has a hidden Safe Mode that is a very useful, though not essential, tool that can save you time and important data and fix an issue created by a mischievous app. Safe Mode is perfect for pulling out the nuisance that is responsible for apps crashing, device reboots, or fast battery drain.
The mode is the best way to check if the issues you are experiencing is caused by a third-party app! When you reboot your phone into Safe Mode, your Android device temporarily disables all third-party apps that you’ve installed on it and lets you analyze the cause. If you see those issues even when the device is in Safe Mode, there might be some problem with the software installed on your device. And if, they just disappear, the culprit is some app installed from the Play Store.
Though Safe Mode does not show the apps in the app drawer and stops them to function, it lets you uninstall those app. Open Settings> Applications> All.

How to Boot Devices into Safe Mode

The Safe Mode tool is found on almost all Android devices but the method of accessing it differs from one manufacturer to other, device to device and sometimes, one OS version to other. Here I’ll try to add the method and hard key combos to get the device into Safe Mode.

SAMSUNG GALAXY S4 SAFE MODE:

  1. Turn off the device.
  2. Press the power button to turn it on.
  3. When the screen turns up keep tapping the soft Menu key that is left to the Home button till the device boots up.
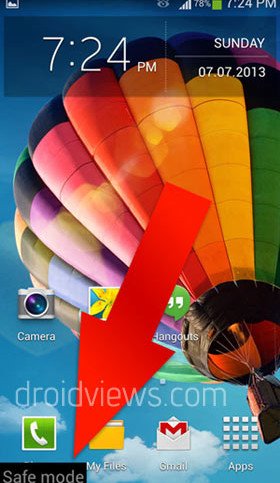
You will see the Safe Mode label at the bottom-left corner of the screen. This will be persistent throughout the UI.
galaxy-S4-safe-mode

SAFE MODE ON GALAXY S3, NOTE 2 AND OTHERS:

This is the most common way of booting Galaxy Devices into Safe Mode:
  1. Turn off the phone.
  2. Press the Power key to restart it.
  3. When you see the Samsung Logo screen, press and hold the Volume Down key till the device boots up.
galaxy-S3-safe-mode

SAFE MODE ON HTC ONE, ONE X AND OTHER DEVICES:

HTC devices have a common method of entering the Safe Mode. I have tested it on HTC One.
  1. Turn fastboot off in your power settings.
  2. Switch off the device.
  3. Power it on
  4. Once you see the  HTC splash screen, press and hold the Volume Up key till the phone boots up in Safe Mode.
On some HTC devices like Desire S, you need to press the Volume Down key instead.

SAFE MODE ON NEXUS 4 AND OTHER DEVICE:

If you got a Google Nexus device or have installed an AOSP, AOKP or CyanogenMod based custom ROM, you can get into Safe Mode as described below. This method works on most devices with Jelly Bean.
  1. Press & hold Power button
  2. It’ll bring up Power off/Reboot options
  3. Then press & hold the “Power Off” option
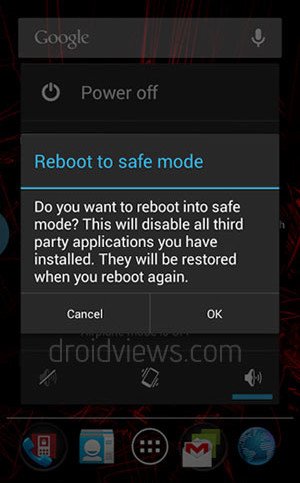
  4. It’ll ask for your confirmation to boot device  into Safe Mode.
  5. Tap OK button.
nexus-4-safe-mode

SAFE MODE ON MOTOROLA DEVICES:

  1. Power the device off.
  2. Power the device on.
  3.  When the Motorola splash screen appears,  press and hold Volume Up /Down keys simultaneously.
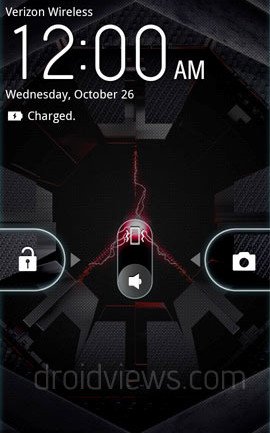
  4. Continue to hold the Volume Up & Down keys until Safe mode appears in the lower left corner of the screen.
motorola-droid-razr-safe-mode
  In case, the method give for your device does not work for you, you can try the steps for other devices.  

How to Exit Safe Mode:

Exiting Safe Mode on most Android devices is as easy as powering off and then turning them on. However, there are a few devices on which you will have  to hold the button combination you used to enter Safe Mode to exit it. There are some other devices that require you to press and hold the volume down key to boot device normally.
Should you ever notice app crashes or battery drain on your device remember Safe Mode before doing a factory reset or reinstall the whole ROM. As always, I just hope it will help you understand your device better! If you have any question, doubts or suggestions, please let me know.
Play safe & cheers to all!

Samsung Galaxy S4 like Micromax A87 Themes

I am pretty happy to share this awesome micromax a87 theme, which will give an exact galaxy s4 look to your A87. When ever we talk about android themes first name came to our minds is Cyanogenmod. Cyanogenmod having a speacial features that is theme chooser, there are thousand of themes available in market which can only be used with cyanogenmod ROM. So congo to all those device user who got cyanogen port, you can check our collection of Cyanogenmod 7 themes. But unluckily cyanogenmod port is not possible for Micromax A87 because of no kernel source. But that doesn’t end the mmx development.
One of our Facebook group developer Viraj Trivedi have done an awesome job he edited the framework & systemui of micromax a87 so nicely to make a galaxy s4 look alike micromax a87 theme. If you are using Micromax A87 ninja 4.0 smartfone then probably you have idea about android rooting, custom rom, cwm recovery, Mods etc. I guess many of you have already rooted there a87, because rooting is the first step of android customisation, only after rooting you can load your device with ROMs , THEMES. So if you haven’t rooted your a87 yet then check out our guide onhow to root micromax a87.

Pre-requirement to Install Micromax A87 Themes

1) 60% Charge level
2) Rooted Device : check our micromax a87 rooting guide.
3) Custom Recovery Installed : check how to install micromax a87 cwm recovery.
[alert-announce] Download Micromax A87 theme [/alert-announce]

How to install this Micromax A87 Theme

1) Download this theme from above link.
2) place it in your sdcard.
3) Boot into A87 cwm recovery mode.
4) select wipe cache.
5) select Install Zip from Sdcard.
6) Choose the micromax a87 theme zip which you placed in your sdcard.
7) Reboot.
[alert-warning] This theme will not work with Cyanomax ROM :Source[/alert-warning]
Micromax a87 theme Screeshots
micromax a87 themetheme for micromax a87
Thats it here’s the end of my post, I am damn sure that you will like thismicromax a87 theme so leave feedback after trying to encourage the developer,so that he can offer lots more themes to you. If you need help regarding micromax a87 theme installation then leave you comments bellow.

How to print from your Android phone or tablet

how-to-print-android-phone-tablet-0105
Android phones and tablets are just like computers. They’re not as powerful, but they’re extremely portable. As portable computers, they can be used to send emails, browse the Web, watch YouTube videos, and all sorts of stuff that you can also do on your desktop or laptop. Yes — including printing.
With the advent of cloud-based printing technologies and services, as well as cloud-ready printers and apps, printing is no longer an impossibility on your Android phone or tablet. In this post, learn how to print from your Android phone or tablet. For a video tutorial, you can skip to the end of this article.

Connecting your classic printer to Google Cloud Print

google-cloud
Some printers let you print from your Android phone or tablet over a Wi-Fi, Bluetooth, or USB connection. However, if your printer doesn’t have such capabilities, you can register your printer to Google Cloud Print, a technology and service that lets you connect your printer to the Web, making your printers accessible wherever you are. You can even make your printers accessible to your friends or print documents from your mobile devices.
Google Cloud Print works with most printers. But, for the best experience, a Cloud Ready printer is recommended. These types of printers can directly connect to the Internet and don’t need a computer for it to work. Google keeps a growing list of Cloud Ready printers compatible with and supported in Google Cloud Print.
google-cloud
If your printer doesn’t have cloud capabilities, you can still connect your classic printer to Google Cloud Print via your computer. For this to work, you will need a Google account and the Google Chrome browser installed on your computer. (If using Windows XP, make sure Windows XP Service Pack 3 is installed on your PC.)
The steps below describe how to set up your local printer for use with Google Cloud Print:
  1. Launch Google Chrome on your computer.
  2. Click the Menu button (represented by an icon showing 3 horizontal bars) at the upper-right corner of the window.
  3. Select Settings.
  4. Click Show advanced settings.
  5. Scroll down to the Google Cloud Print section and click Add printers.
  6. Log in to your Google Account to enter Google Cloud Print
  7. A confirmation message appears on the next screen. This will register the printer that is connected to the computer. Click Add Printer(s) to confirm.
  8. Your printer is now registered with Google Cloud Print
Google Chrome acts as a go-between for your printer and Google Cloud Print. When you print something from your mobile via Google Cloud Print, you actually send data from your mobile device to Google Cloud Print, which forwards it to Google Chrome, which in turn tells your PC to print the document on the attached printer. So, to print via Cloud Print, always make sure that your PC is connected to the Internet, that you are logged in to your Google account in Google Chrome, and that your printer is on.

Printing from your phone or tablet

how-to-print-android-phone-tablet-0106
Now that your printer is accessible via Google Cloud Print, it’s time to print from your Android phone or tablet. For that, you will need Google’s official Cloud Print app for Android.
  1. Download, install, and launch Cloud Print on your Android phone or tablet.
  2. Set your Google account, making sure that you use the same account as the one you registered on Google Cloud Print.
  3. Tap the printer icon to select a file to print. You can select a file from Google Drive, Dropbox, Gallery, and other file manager apps on your device.
  4. The next screen will show you a list of your printers registered on Google Cloud Print. Select one printer.
  5. The print preview page will appear. You will be able to set the orientation of the document, media size, DPI, and the number of copies.
  6. Once all are set, tap the paper plane icon at the top row to send the data to Google Cloud Print and print your document.

PRINTING WEB PAGES AND GMAIL MESSAGES

Printing Web pages is also possible through Cloud Print. Just open your Android browser’s Menu, tapShare, and select Cloud Print. From here, you can then print the Web page to any of your printers registered on Cloud Print.
how-to-print-android-phone-tablet-0107
Or, if your phone or tablet’s Internet browser supports printing functionality, you can directly send the Web page to your printer over a Wi-Fi, Bluetooth, or USB connection.
how-to-print-android-phone-tablet-0108
As for printing Gmail messages, Google’s Gmail app for Android doesn’t have an option that allows you to print your mails. But, if you access your Gmail account through a Web browser app, you can print your mails.  Just open a Gmail message in your browser, tap the arrow to reveal additional buttons, and select Print. You will then be taken to Google Cloud Print to print your mail.

Third-party printing apps

Several third-party apps for mobile printing are available on the Google Play Store, including such apps as Cloud Print (by Paulo Fernandes) and PrinterShare Mobile Print (by Mobile Dynamix).

CLOUD PRINT BY PAULO FERNANDES

how-to-print-android-phone-tablet-0109
Developer Paulo Fernandes’s Cloud Print app for Android may have the same name as Google’s official app for its own service of the same name, but the two apps are different. Both, however, use the Cloud Print service to allow printing from phones or tablets.
The free version of Fernandes’s app comes with ad support and has certain features restricted, but the app is generally still usable. You can upgrade to its premium version for about US$3.00 to remove the ads and remove the feature restrictions.
Here are the general steps for using Paulo Fernandes’s Cloud Print app:
  1. Download, install, and launch Paulo Fernandes’s Cloud Print app on your Android device
  2. Select or add a Google account that you registered with Google Cloud Print.
  3. On the next screen, select a printer registered to your Google Cloud Print account. You can either select Google Cloud Print ready printer, HP ePrint printer, or Other Printers.
  4. A list of registered printers will be shown on the screen. Select one that you want to use.
  5. On the next screen, tap Print test page to check if your printer has successfully connected to Google Cloud Print. Or, you can tap the arrow at the bottom of the screen to skip this step.
  6. Once the app and printer have been set, you can now print from your Android phone or tablet using the Cloud Print app.
What I like about this app is that it allows you to print your SMS messages, scan documents by taking a picture and print them afterwards, create scribbles or drawings for printing later, or jot down notes and print them later. The app also allows you to access your Dropbox and Box files, Facebook images, Google Drive files, Gmail attachments, and Google Calendar events and print those files from within the app.

PRINTERSHARE MOBILE PRINT

how-to-print-android-phone-tablet-0110
PrinterShare Mobile Print also uses Google’s Cloud Print service to connect your printer and Android phone or tablet via the cloud.  The app’s free version includes the following features:
  • Perform a printer test to printers connected via Wi-Fi, Bluetooth, or USB
  • Free and unlimited printing via Google Cloud Print
  • Print up to 20 pages over the internet with Remote mode.
You can upgrade to its premium version for about US$13.00 to be able to connect and print to your printer via Wi-Fi, Bluetooth, or USB. The premium version also lets you print to shared Windows or Mac printers nearby, as well as print without limit with Remote Mode.
Here are the general steps for using PrinterShare Mobile Print:
  1. Download, install, and launch PrinterShare Mobile Print on your Android phone or tablet.
  2. Open the settings menu and tap Select Printer.
  3. On the next screen, select your printer connection type. You can connect via Wi-Fi, Bluetooth, USB, Google Cloud Printer, or through a Remote Printer. For now select Google Cloud Printer. (NOTE: If you’re using the free version and you connect your device to your printer via Wi-Fi, Bluetooth, or USB, you will only be able to perform a printer test unless you purchase the premium key.
  4. Select a Google account and the printer registered on your Google Cloud Print account.
  5. Once the printer has been set up, you can now print from your Android phone or tablet via PrinterShare Mobile Print.
The types and categories of files that PrinterShare Mobile Print can print are displayed on the app’s main screen. You can print pictures, contacts, calendar, Web pages, SMS messages, call logs, Gmail messages, Google Doc files, and other documents.

Conclusion

Mobile printing has become easier, thanks to Google Cloud Print and third-party printing apps on the Google Play Store. With these technologies and services, you can easily print your files or data from your Android phone or tablet.
How often do you print from your Android phone or tablet? Do you use a different method or solution? If so, what solution do you use? Share your thoughts and experiences in the comments section below.
 

© 2013 iFlasha. All rights resevered. Designed by Templateism

Back To Top